Template:Infobox placeSword Fight on the Heights IV, (often abbreviated to SFOTH IV), is a popular sword fighting game created by Shedletsky. There are many different swords to fight with that are hidden throughout the level. The goal is to amass KOs while avoiding death. To make the game more challenging, there are several obstacles such as wobbly plates, disappearing tiles, and "tightrope" bricks that have a tendency to get in your way, thus making the game combines sword fighting with agility and hand-eye coordination. The game is centered around large, tall floating islands located around the level, and paths (normally a "tightrope/plank" or an obstacle) connect the islands. There are swords and other objects along the map that will assist the player when collected. On May 5, 2016, comments were disabled.
Swords
Sword Chart
|
Swords |
Base Damage |
Slash Damage | Lunge Damage | Special |
|---|---|---|---|---|
| Normal | 5 | 10 | 20 | N/A |
| Venomshank | 5 | 10 | 20 | Target turns green and loses 1/8 of their max health every 2.2 seconds for 11 seconds |
| Ice Dagger | 5 | 10 | 15 | Target freezes and then dies. Three second delay time for ability to activate after equipping. |
| Darkheart | 20 | 16 | 32 | Target turns black and explodes. Attacker is given 40% of attack damage back as health. |
| Illumina | 10 | 20 | 40 | User has higher jump height (when lunging). Able to detect nearby invisible enemies. |
| Ghostwalker | 10 | 15-25 | 30-50 | User is transparent and has less gravity. User's transparency and slash/lunge strength increases with every kill. (Max. 9) |
| Firebrand | 10 | 12 | 25 |
User is not affected by the Ice Dagger's instant kill effect. |
| Windforce | 10 | 18 | 36 | Target is pushed back. |
A sword called "Firebrand".
Normal/Linked sword


3 players ready to fight with their swords.
All players are immediately given a normal sword once they spawn. Upon touching an enemy, the sword inflicts 5 damage , which, presuming they do not have battle armor, 1/20th of an enemy's health. The sword will then inflict additional damage based on how the sword hit the enemy; if the character had slashed the enemy, the sword will inflict 10 extra damage - 1/10 of the enemy's health, and if the character had lunged at the enemy, the sword will inflict 20 extra damage - 1/5 of the enemy's health.
As with all swords, doing a lunge attack will cause the player to fly upwards a short distance.
Venomshank
This sword does the same amount of melee damage as the normal sword. However, when a target is hit with it, the target becomes poisoned and loses 1/8 of their max health (meaning health buffs such as battle armor are countered) every 2.2 seconds for 11 seconds. As an aesthetic effect, the target also becomes colored green and will be unable to remove the color until their next death (or if the poison wears off). However, if someone is killed with the poison effect, the user who poisoned said player receives no KO for that kill. The damaging effect can be countered by using a medikit, healing pack, or by damaging someone with the Darkheart.
Ice Dagger
Ice Daggers are extremely lethal when used correctly. When an enemy is hit by a blue Ice Dagger, their body turns transparent blue, they are frozen, and after 2 seconds of being hit, the enemy is killed. In order to compensate for this, when an Ice Dagger is equipped, it is not deadly for 3 seconds. In addition, the Ice Dagger cannot perform its instant kill ability on a player wielding a Firebrand.
The Ice Dagger is located past the main courtyard's lava spinners.

.jpg)
Ice Dagger spawn.
Darkheart
The Darkheart can be a dangerous sword when used correctly. The Darkheart sword returns 40% of all the damage you deal back to you, even when you try to deal damage to a person with a force field around them. As such, the Darkheart can be used as an easy way to heal up - by attacking players with their force field still active. It can be found inside a small cave at the bottom of the black mountain, where the Shadow Sphere can be found at the top.
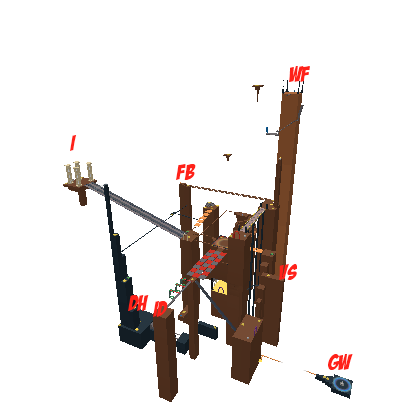
Locations of each sword.
Illumina
A sword that lets you jump higher than normal if you lunge with it then jump. It also releases sparkles, which can help detect nearby invisible or transparent foes. This sword has the highest base damage in the game, excluding a Ghostwalker with several kills. The Illumina is on the floating island with four beige columns surrounding it.
It is good for countering Ghostwalker because of the ability to detect invisible enemies, and Darkheart because of the high damage output dealing out more damage than a Darkheart user can heal.
Firebrand
The Firebrand has the longest reach of all the swords, tied with Venomshank. A player who is actively wielding the Firebrand cannot be instantly killed by an Ice Dagger user.
The Firebrand is located across a tightrope bridge above the floating orange plates.
Windforce
When a player lunges at an enemy with this sword, it pushes the enemy back far away. It has a slightly longer reach than the normal sword, but has a shorter reach than Venomshank/Firebrand. People that are pushed off the map do not give you a KO when they die from falling. If you are confronted with someone using this, do not attempt to kill them unless you have a Venomshank or Firebrand; the only swords that have a longer reach. It can be useful to kill people who are wielding Darkheart or Ghostwalker.
The Windforce is located is on top of a mountain accessed by the blue portal in the "Saferoom".
Ghostwalker
The Ghostwalker is the only sword that can vary in damage. The more players you kill with it, the more powerful it becomes. As you kill people, the number in its name increases from 0 to 9. The sword will become more powerful if you kill beyond this amount, however it is not shown. When you wield this sword, you become partially transparent (the higher the sword level the more transparent you become) and a body force object is used to lower your gravity, thus allowing you to jump over four times as high. If you perform a lunge attack by double-clicking rapidly, the initial vertical force of the lunge attack combined with the low-gravity attribute causes the player to fly extremely high. This is good for getting out of skirmishes and battles. Having two Jet boots and a Ghostwalker can provide for unending flight, however it is very hard to chat or do other things besides flying.

This is the path where you get the Ghostwalker sword.
(Note: All values are rounded to the nearest thousandth)
| Level | Slash | Lunge | Transparency |
|---|---|---|---|
| 1 | 16.111 | 32.222 |
0.289 |
| 2 | 17.222 | 34.444 | 0.378 |
| 3 | 18.333 | 36.667 | 0.467 |
| 4 | 19.444 | 38.889 | 0.556 |
| 5 | 20.556 | 41.111 | 0.644 |
| 6 | 21.667 | 43.333 | 0.733 |
| 7 | 22.778 | 45.556 | 0.822 |
| 8 | 23.889 | 47.778 | 0.911 |
| 9 | 25 | 50 | 1.00 |
Powerups
Medikit
When you click with the Medikit equipped, the Medikit turns your entire body white, fully heals you, then disappears. It cures poison from the Venomshank and, as such, good players will always keep one with them just in case.
Tip: Always keep two, in case you are working with a teammate.
Shadow Sphere


The Medikit.
The Shadow Sphere will make you invisible for a short period of time, but players can detect you with Illumina. If you unequip the sphere, you will become visible, even if your invisibility timer has not yet run out. When you become visible again, the sphere will be rendered useless until it recharges. You cannot use a sword while you are invisible. You can find the Shadow Sphere at the top of the Darkheart spire.
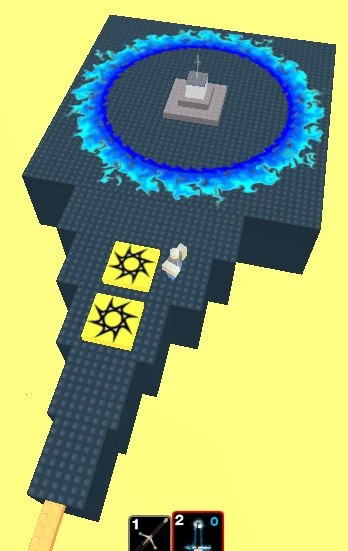
Touchstone
Teleports a player to the "Saferoom" area in Sword Fight on the Heights where you cannot be killed. The Saferoom area is located under the main ring of fire in the center of the game and gives you a forcefield until left. The Saferoom contains four portals, each of which lead to different areas within the map, some of which you can use to your advantage. The Touchstone is used by players who need a quick getaway or need to access a certain area quickly. For example, if a player has low health and is being chased, they might jump off a ledge with it, then quickly use the Touchstone to teleport to the saferoom, or if a player needs the Illumina, the player would use their touchstone to access the portal that leads to Illumina. This makes their chaser think they killed themselves, and they did not live. Most of the time they do not see you use the Touchstone. It is very useful to use if you accidentally fall off the map, unless it breaks.
Shield Sphere
Also known as the "Sphere" or "Plus Sphere" (due to its icon in your backpack). When used, the Shield Sphere puts a forcefield around your character and mitigates all damage as long as the force-field is still attached to you. The force-field wears out after a while and has a cool-down before it can be used again.
Note: Always bring this item with you when going through a portal, because enemies can be waiting outside of the portal to perform a surprise attack on you.
Jet-boots
(As of May 2020, the Jet-boots are unobtainable) When you click and hold down your mouse, you rise into the air, much farther than you could with any other jump. You can fall at any time by releasing your mouse. After a while, it runs out of "fuel" and you plummet down to earth, or off the map! Be sure that there is ground under you when you do run out of fuel. Eventually, you will regain fuel so you can use the Jet-boots again. You can only activate the boots if you have full fuel. There is no indicator as to how much fuel you have, so you should time your usage wisely. (Updates have made the Jet-boots useless, they no longer work.)
Battle Armor
When a player touches the Battle Armor, their maximum health doubles and their torso turns shiny, indicating that the player is wearing the said armor. Your health on its own will not be increased along with your maximum health, however, but the armor still allows you to take more damage before you die. The Battle Armor was once not usable with the Shadow Sphere, as the Shadow Sphere did not turn the armor invisible. However, this glitch was fixed in a later patch, and it is now possible to use the Shadow Sphere in conjunction with the Battle Armor. If a player has Battle Armor then they cannot see the shiny torso if they have a T-shirt, torso, certain pants and shirts unless they removed it.
Special Objects
Trampoline
Trampolines are characterized by their black and yellow circular patterns (formerly, they had a yellow, shiny appearance). Trampolines, when jumped on, will launch the player up to places which they could not access using regular equipment.
Trampolines were broken for several years starting around 2015-2017; they were fixed in May 2020. Though they were still accessible, players would have to pull out and put away the Linked Sword repeatedly while walking over the trampoline. It took about a minute or two to do and once executed correctly, the player would fly up. Doing this was necessary to obtain the Shadowsphere.

Attempting to Trampoline in SFOTH IV
A video from 2017 showing the broken trampolines
Wobbly Plate
A plate that, when stepped on, tilts under the weight of the player. They can be identified by their light orange color and wooden texture.
Healing pad
A pad that, when touched, heals you to full health. The healing pad has a cool-down - during the cool-down it turns red before turning green - when the pad is green you may activate it again. Healing pads can be characterized as having a black base and a green/red button on top of the base. Healing pads are scattered all around the map.
Disappearing Tiles
These tiles, characterized by their red/grey checkerboard pattern can be found near the center of the map and connect the center of the map to the spire holding the Ice Dagger. These disappearing tiles will be visible for a while, and then disappear, and re-spawn again. During the duration in which the tiles are invisible, the player will not be able to use the tiles as platforms, and if they try to jump on an invisible tile, they will fall and die.
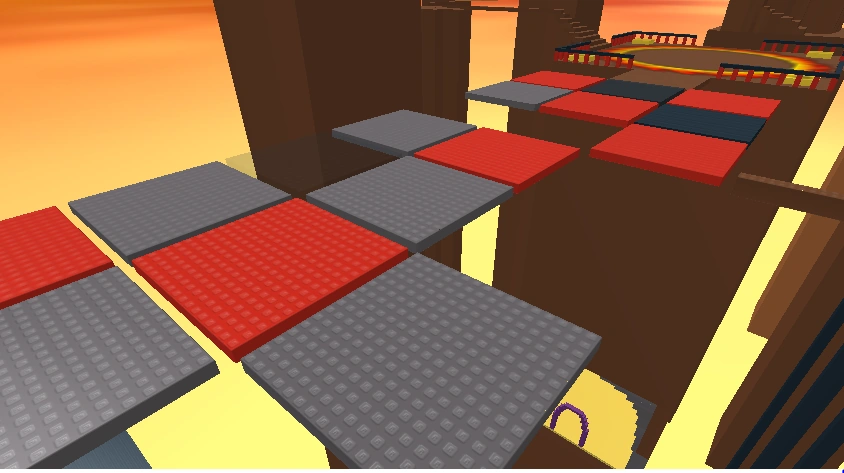

Disappearing tiles
It is possible to make all these plates disappear at once by touching a button in a room on the structure on the side of the disappearing tiles. This can be useful to trap players and make them fall when they're walking on the tiles.
Lava Spinners
Found on the path leading to the Ice Daggers, these lava spinners are mounted on green posts and will constantly rotate. The lava on these spinners, is, of course, lethal, but other dangers from crossing this path include being knocked off the path by one of the spinners. Be careful around this area, as many new players have fallen to this dangerous obstacle. To prevent from being killed by the spinners, the player must use the Forcefield Sphere and walk through the spinners. If the player passes this obstacle, he/she can receive the Ice Dagger.
Teleportation Gate
There are 8 gates throughout the level. There are two gates of similar color that always lead to each other. There are 4 gates in the Safe area, and four scattered throughout the level.
The tan one leads to the area where the conveyor belts to the Illumina are.
The blue one leads to the base of the Windforce tower. There is no other way to get to the Windforce tower, unless you use Jetboots, or re-spawn there.
The red one leads to the Medkit stand, and the bridge to the Jetboots.
The purple one leads to the large platform where the Shield Sphere is.
Fire Warp
You may have noticed a long, out-of-place brick at the top of the windforce tower. This brick, when jumped into, acts as a warp that teleports you out of another warp - this warp leads to the Venomshank spire, however the warp only launches you vertically next to the Venomshank spire, so remember to move towards the spire after teleportation, otherwise you will fall through and die. A physics update broke it causing you to launch into the Ring of Fire instead of being launched vertically next to the Venomshank spire.
Tips and Strategies
- General tips
- When you are equally matched with an opponent, you can try fishtailing or spinning by pressing A and D after double clicking to cause massive damage. This is effective with Venomshank and Firebrand.
- Though powerful, the Ice Dagger is very short meaning experienced players can kill you with their sword easily before the dagger gets a chance to freeze the player. Even if the dagger is able to kill the player, it is also common for damage to be taken first.
- Even though the Ice Dagger is very dangerous as it one-hit-kills, the Firebrand makes you immune to instant freezing.
- If someone is trailing you, it's smart to kill them immediately before they can cause any harm to you.
- The Venomshank is dangerous if you're caught unarmed. Be sure to carry a Shield Sphere or Medikit to ward off poison.
- While hard to get, the Ghostwalker greatly helps with movement. One can evade lots of sticky situations with it.
- Illuminas are dangerous - because of the extra jump height, Illuminas can be used to jump over an enemy and stab them in the back.
- Don't lead players into areas that are too hard to navigate. You do not want them falling off and killing themselves when you could have killed them with a sword and gotten a KO instead.
- If you are in a very sticky situation without the Ghostwalker, turn around face your enemy and jump over him/her. it confuses your enemy as well as gives you a chance to run or kill.
- Don't sword fight from the first person view, as it makes you can't directly see your backside without having to turn (zooming in all the way creates a first person view).
- Be sure to have at least one special sword/item if you're going against someone. The DH is recommended because of it's versatility and healing capabilities.
The "Alt Farming" Strategy
Sometimes, maxing out the Ghostwalker can be a bit difficult. This way of maxing it out is quite simple, however, not everyone can do it. It requires 2 instances of Roblox at once. If you are using Windows 10, use roblox on the web at the same time as you use roblox on the Microsoft Store. If you dont have Windows 10, use another device. Control the 2nd instance to the Ring of Fire, jump off of the edge and land on one of the trusses holding up the safe zone. Climb down the truss into the 1st instance's place in the way that you are just out of the forcefield area and use the 1st instance to kill it. Your 1st instance MUST stay in the safe zone. Repeat until you have maxed out your Ghostwalker.
The "Ring of Fire" Strategy
Staying in the "Ring of Fire" is dangerous if you're not properly equipped for constant combat. Bring a shield sphere, a Darkheart, 2-3 Medkits, and a Firebrand (to counter Ice Dagger users). Be sure to use healing pads if they are open and vacant (meaning, there's no one heading for it). If you cannot keep up with the foe, jump off the edge of the ring and try to land in the safe zone below. An Illumina or Ghostwalker helps the maneuver greatly. The Ring of Fire can

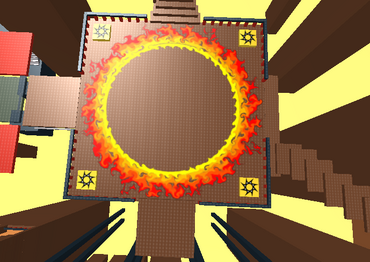
The Ring of Fire
get you large amounts of KOs, and lets you control the busiest crossroad in the level, but it is extremely hard to last there, and is only recommended for experienced sword fighters.
The "Invisible Assassination" Strategy
This involves a level 9 Ghostwalker, so be prepared for this in advance. Level 9 Ghostwalkers are hard to obtain as they need nine consecutive kills with the same sword. The general idea of the strategy is to find the small ledge over the Darkheart's cave and hide your Ghostwalker in the wall, while the rest of you stays invisible. When a player walks by to get a Darkheart, you drop in, take them out, and throw the Darkheart off the stage. Rinse and repeat. However, the strategy gets suspected after one has been pounced on 2-3 times, so you should use this strategy to cut off Darkheart supply when things are getting rough. Do not expect to use this strategy successfully your entire game, as people can and will catch-on to your antics.
If you feel they caught on, let them get the sword, then they will think you moved on or died.
The "Ice-counter" Strategy
In a server full of Ice Daggers, Get a Firebrand, a few medkits, a battle armor, and a Shield Sphere, and get ready to camp near the Ice Dagger! It is remote, so you can't make a supply run during the strategy, so be sure to stock up beforehand. The idea is you're immune to any existing Ice Daggers, and you're very defensively set up. You can pretty much fend off anyone going for an Ice Dagger, and you can easily handle anyone WITH the dagger. Again, do not expect to last here for your entire game. This is only a temporary fix for the problem, but you can continue it until everyone who relies on an Ice Dagger quits.
The "Classic Assassination" Strategy
Got quick moves? You better try this, grab at least 2 or 3 Shadow Spheres from the top of black mountain. Next, pursue a player, while you're nearby, use the Shadow Sphere to get closer. Be careful though, because it is possible for someone to use Illumina to reveal you. When you're close, change into another sword and then kill your opponent. Note that the Shadow Sphere's effect doesn't last long. This strategy is also useful if you being pursued. First, use the Shadow Sphere to sneak behind them. Sometimes you need to use 2 Shadow Spheres. Then pursue the enemy and then stab them in the back when ready.. This strategy is simillar to the Invisible Assassination.
Glitches
- If a player uses a medikit to cure poison while he/she is green, the medikit saves the green color of his/her player. When the medikit turns him/her white, it will revert his/her colors back to the poison color and it is impossible to get his/her old colors back (unless the player's old colors are all green or all white).
- When someone jumps from the Windforce's spire onto the teleporter, the body position that moves a player may not work. It keeps him/her in one location, and he/she cannot move until the body position is removed. When it is removed, he/she would fall off the ledge with no chance of survival, unless he/she have Jetboots, a Touchstone, or a Ghostwalker to stop your fall.
- If a player spam clicks the Ghostwalker and Illumina at the same time, he/she will permanently ascend until he/she resets.

Ghostwalker and Illumina Ascending Glitch
Badges
- Shedletsky has put an assortment of badges in this place. Here are all the badges that you can earn here.
| Badge | Description | Image |
|---|---|---|
| 5 Kills at Sword Fight on the Heights | Score 5 kills at Sword Fight on the Heights to win this badge. If you can't do this, maybe you would rather play "Tea Party on the Heights" or "Sword Dancing at Fat Camp With Starwars Kid". | 
|
| 20 Kills at Sword Fight on the Heights | Score 20 kills at Sword Fight on the Heights to win this badge. If you can do this you probably know enough about sword fighting to not stick yourself. | 
|
| Blademaster | Masters in the art of swordplay win this badge by achieving a score of 20:0. Anyone who has this badge is very dangerous. | 
|
| Meta Pwn | You pwned someone who pwned John. It's nice to know that someone has my back. | 
|
| John, Loved of Muses | Awarded to people who find my "signature" that I left on this level. | 
|
| 97 Kills at Sword Fight on the Heights | I know what you're thinking. "Why 97?! What is Telamon's deal? That makes no sense." To these people, I say: "YOU MAKE NO SENSE". 97 is an elite number of kills. If you get that many, you rock. | 
|
| Blame John | You got pwned. | 
|
| Pwned Shedletsky | Ouch. | 
|
| Pwned Shedletsky *EPIC* | Pwn Shedletsky with a normal sword? You are either: 1) very lucky 2) very good or 3) both. | 
|
| OMG It's Shedletsky! | You met Shedletsky in-game. He was probably too busy pwning noobs to chat too much. Sorry! Ping me on twitter if you want @shedletsky | 
|
Removed Content
- The following is content that is no longer present in the game.
- HACK Sword Fight on the Heights was a Gamepass that costed 30 Robux and gave you Admin powers in the game, It was removed on September 15, 2015 due to lots of abuse. The gamepass can be found here .
- Touch The Divine (Unobtainable)
- This badge is impossible to obtain and is designed to test new security features. " If a user were to use any form of exploit to grant themselves this badge, that user would automatically receive a ban.
Shirts
Telamon (Shedletsky) has put 2 shirts in the game. Both shirts have to do with being in a game with Shedletsky the creator of the game.
- Blame John
- Get killed by Shedletsky in a game to earn this shirt.
- Pwned John
- Kill Shedletsky in a game to earn this shirt.
")
")
Feature testing
SFOTH IV has been used several times as a means to test upcoming new features on Roblox. The most recent example of Roblox testing at SFOTH IV was to test "place galleries", a feature which was released a short time later. Another example of Roblox testing at SFOTH IV was the Egg Hunt 2010 that happened around May.
Description
The description of the game is "Run run run." (later changed to "Death before dishonor.") This may be different to Temple Run, where you have to run away from monkeys. However, in SFOTHV, you have to run away from players that have swords.
Image
The main image for the game shows two avatars wearing The Kleos Aphthiton and the Coif of Glory with matching outfits respectively. The Coif of Glory avatar is being stabbed with a Firebrand.
Catalog items
All of the unique swords from this game have been made into gear items in the catalog, and can be viewed as a series here.
Gallery
")
")
")
")
")
")
")
")
")
")
")
")
")
")
")
")
")
")
")
")
")
References
<references>