Welcome! This is the second tutorial in the scripting series, right after the newbie's guide. There are some concepts that will be reviewed, so reading the newbie's guide first is highly recommended.
This is the second tutorial. The general focus of this tutorial is to reinforce basic coding skills, reinforcing our pathfinding skills and creating more complex statements using the equals sign (=) to assign values.
Author's Notes[]
- Note that this tutorial, as well as the entire series, will not magically turn you from a newbie to an expert. You can have all the tutorials and tools in the world, but ultimately, the one thing that will improve your skills as a developer is practice and patience. So take the time to make sure you truly understand each concept before moving on.
- If there are concepts that remain unclear in this tutorial, feel free to ask an expert or look up a tutorial on YouTube.
- Consider the quote, "Science is more than a body of knowledge. It's a way of thinking." Because coding is part of computer science, it applies here. What this quote means is that there's more to coding than just typing up scripts. A lot of the time it will require you to get creative and think of other ways to reach a solution.
Review[]
Here are some of the main concepts we learned in the newbie's tutorial. If you are unfamiliar with these concepts, it is recommended that you go back to the newbie guide because it will explain the concepts in greater detail.
- The Home Tab contains several tools to insert and manipulate shapes.
- Three-dimensional shapes in Roblox are called parts, and you can modify its shape, size, colour, texture and name.
- A script contains the code.
- The Explorer window is the list of all the objects in the game, and it has a hierarchal structure.
- To create a path to an instance, you start with the word game then work your way down the hierarchy.
- In the Explorer window's hierarchy, a parent is one step above its child.
- A complete statement must perform an action on an instance.
Do you have all that? If so, let's begin the new stuff!
Properties[]
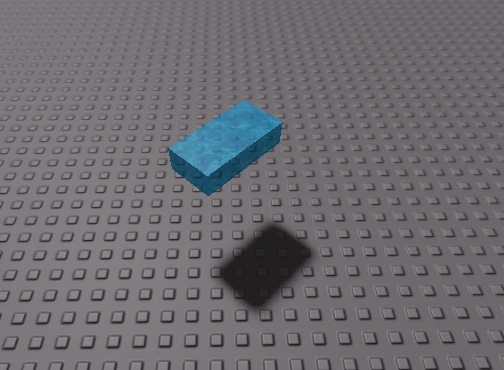
How would you describe this part?
Take a look at the part on the right. How would you describe it? There are many things you could say about it, like:
- It's light blue.
- It is marble.
- It is a little transparent (see-through).
- It is four studs long, two studs wide and one stud tall.
- It is rotated by 45 degrees.
- It is positioned a little bit above the baseplate.
- It casts a shadow.
These are all called properties. A property is a characteristic of an object that you can change using the Properties window. If you haven't already, go to the View tab and open up the Properties window. Then click on a part. In the properties window are all the properties of the part, and you can change these properties by typing in text, entering numbers, or ticking a checkbox.
The main properties a beginner should know are:
- BrickColor: the color of the brick.
- Material: the texture of the brick.
- Transparency: changes how see-through the brick is.
- Size: the dimensions of the objects in studs. You must enter three numbers, one for length, one for width and one for height.
- Position: the location of the brick, using coordinates. You must enter three numbers, one for each axis.
- Orientation: allows you to rotate the brick along all six degrees of freedom. You must give three angles, each ranging from 0 to 360.
- Name: the name that is attributed to the brick.
- CanCollide: whether or not other objects will pass through the object; if the checkbox is flicked off, objects could pass through it uninterrupted.
- Anchored: whether or not the object is subject to change position. If the checkbox is turned on, the object will not be affected by gravity.
But how do you set a property using a script? Well...
Making Paths[]
You should have already have a basic idea on how to make a path if you have read the Newbie's guide, but if you haven't, this section will explain it briefly.
Create a part and a script into the Workspace. Delete any existing code in the script.
First we need to access the part. Start by typing "game".
game
The word "game" should turn blue (or red if you had dark mode enabled.) Now, access the Workspace, by typing a period, then "Workspace".
game.Workspace
Then, access the Part. You'll notice that the part tab has a little indent compared to the Workspace tab. We say that the Part is the Workspace's "child," and that the Workspace is the Part's "parent." In Roblox, the Explorer window is organised sort of like a hierarchy, where objects are placed on a sort of "rank."
game.Workspace.Part
Of course, if you had renamed the Part, you'd need to replace "Part" with the name you gave it. Also, make sure that no two parts are given the same name: otherwise the script won't know which part to access.
Now we set the property. We say that the property is a child of the part. So...
game.Workspace.Part.Transparency
To set the value, type an equal sign, followed by the value. So the completed code would be...
game.Workspace.Part.Transparency = 1
Spaces around the equal sign is optional, but it makes the script neater. So, when you playtest the game, you'll see that the part suddenly vanishes. In reality, it had just been made invisible by the script.
This method can be used for all properties except for Size, Position, Orientation, and Color3, which we will explain later.
Alternatively, in the Explorer window, drag the script onto the part, if it is done correctly, it should look like this:
script.Parent.Transparency = 1
There are a few new terms here. When you say "script," the game will assume it means the script the text is on. When you say Parent, instead of looking for the script's child, it'll access its parent.
If you had made a mistake, chances are the game will have noticed it. Go to the View Tab, then click on "Output." A window will appear, and if the game found an error, it would print an error message nice and bold in red. Clicking on the red message will take you to the source of the problem.
Note: If you need to set a text value, place the value in quotations. Also, Color3 and BrickColor values are done differently, and I'll need to cover that later.
An alternative way to access a child is by wrapping the name in quotations and square brackets.
game.Workspace["Killbrick"]
game.Workspace.Killbrick
Both of the above lines serve the same function. However, you must use the square brackets method if the name of the object contains spaces. (For example, if "Killbrick" was renamed to "Kill brick," you would use the square brackets method.
A couple more intricate ways of getting children are like this:
game.Workspace:FindFirstChild('KillBrick', true)
game.Workspace:WaitForChild('KillBrick', 5)
Using :FindFirstChild() will find for if there is a child named 'KillBrick', with a 'recursive' value (defaulted to false) to check all descendants (all children, and children of children, etc.) until KillBrick is found. Alternatively, using :WaitForChild() will yield the script until a child is added or found named 'KillBrick', with an integer (defaulted to inf) on the maximum time in seconds it will yield until breaking if not found.
Now, things will get a tad bit more complex. A "folder" is an object that can be inserted into the Workspace that holds multiple objects together as a sort of organizational tool. A "model" is another object that serves a similar function. Oftentimes developers will place models inside folders. A good rule is to start with "game," then work your way down to the object.
game.Workspace.Folder.Model.Part.Transparency = 0
You can see that this shows a more complicated hierarchy. The part is placed in a model, inside a folder, in the Workspace. Of course in these complicated situations, names such as "Folder," "Model," and "Part" should be renamed to prevent confusion. A good rule of thumb is that if something should be accessed in a script, it should ALWAYS be renamed.
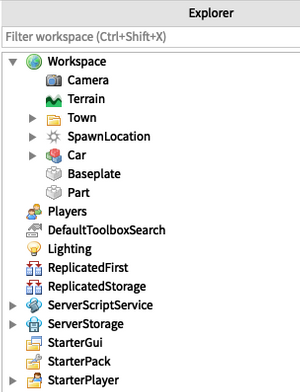
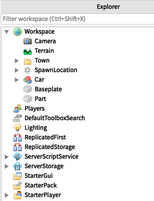
Practice! Take a look at the Explorer window below.
- Change the model's parent to the workspace so that it's not inside the folder.
- Change the ToolTip property of the Tool to "This is a wrench."
- Change the sound's volume to 0.75.
Below are the answers.
script.Parent.Parent.Parent = game.Workspace
game.StarterPack.Tool.ToolTip = "This is a wrench."
game.SoundService.Sound.Volume = 0.75
Output Window[]
It is only natural that you make mistakes in your code and it doesn't work out the way you want. This is called a bug, when a coding error leads to an unwanted result. Output window is the best place to fix your bugs.
Let's practice this skill. Go to the View tab on the top of the screen and click "Output." A window should appear.
Then create a part, then a script inside. Position the part a little bit above the baseplate.
Now, copy and paste the following code into the script:
script.Parent.Transparency = 0.5
script.Parent.Name = "Bob"
script.Parent.Material = "Steel"
script.Parent.Anchored = true
If you hit the Play button, it should make the part semi-transparent, name it "Bob," change its material to "Steel," and anchor it.
But wait! It doesn't work! The part is now semi-transparent and now named "Bob," but its material is still plastic and it isn't anchored because it fell into the baseplate. What went wrong?
Go to the Output window. You should see a red error message on there. Can you figure out what this means?
Unable to assign property Material. Invalid value "Steel" for enum Material
If you are able to interpret this one correctly, it means that "Steel" isn't a real material in Roblox. You have to pick another one.
script.Parent.Transparency = 0.5
script.Parent.Name = "Bob"
script.Parent.Material = "Metal"
script.Parent.Anchored = true
This one will work. Try another one. Can you spot the error?
script.Parent.Material = "Granite"
script.Parent.Transparency = 0.4
script.Parent.CanCollide = false
script.Parent.Reflectance = true
script.Parent.Anchored = false
script.Parent = game.Workspace
Variables[]
What is a variable in math? If you aren't familiar with this concept, the n in the below math statement is a variable.

The letter n is used to represent the number 3. If you were to replace the n with the number 3, the equation would still be true.

A variable is similar in coding, but with three main differences. One difference is that our variable names don't have to be single lowercase letters. They can have uppercase letters, numbers, and even underscores. However, it cannot have spaces.
Another difference is that variables in coding rarely stay the same. While the n in the math equation will always equal 3, the script can change the variables when needed.
Declaring and Updating[]
When we declare a variable, we are creating a new variable and assigning it a value. This is how we do it:
local Var = 0
Here, we start with the word local to signify that it is a local variable. Then, we are declaring a variable named "Var." We are also establishing that the variable "Var" is equal to 0. In other words, we are defining a variable. A few things to remember:
- The local is optional, but it is common practice to use it always because it is faster for the system to obtain.
- Variable names are case sensitive. Therefore, "Var" and "var" are two completely separate variables.
- You cannot use variables declared in other scripts.
Then, we can update the variable, meaning we give it a different value. For example:
local Var = 0
wait(1)
Var = 20
Line 1 declares a variable and defines it as 0. Line 2 waits one second. Line 3 updates the variable, meaning that the variable now equals 20. Note that we don't use the word local when updating a variable.
Variable Types[]
The final difference is that variables in coding don't have to represent numbers. There are five basic types of variable values:
Instances[]
All these are instances.
An instance is an object in the Explorer. This refers to parts, light objects, and more. An example of this is the Parent property of a part.
To set an instance variable, make a path, as explained above:
local Car = game.Workspace.Car
Integer Values[]
An int value, otherwise known as an integer, is basically any number that is not a decimal. An example of this is the Brightness setting of a light object.
To set an int value, you can simply enter the number. Note that the number should turn aqua (or yellow for dark mode).
local IntVar = 12
Float[]
A double-precision floating point format, often shortened to float, is any number that allows for decimals. Usually, they never have more than 3 decimal places. Just like int values, you can simply enter the value.
local FloatVar = 0.02
Boolean[]
A boolean, otherwise known as a bool value, is a value that is either true or false (yes or no). In the Properties window, the properties with a checkbox is a boolean.


Checkboxes imply booleans.
To set a boolean, enter either true or false.
local boolvar = false
Strings[]
A string is any text that uses letters, symbols or spaces. To enter one, you must wrap it in quotation marks.
local StringVar = "Cheese"
Here, the word "Cheese" is wrapped in quotations.
Of course, there are other data types, like CFrame and Enum, but we'll get to those later.
Nil[]
Nil, also known as null in other languages, is nothing; the absence of any data. Nil is not a data type in its own right, therefore variables of any data type can be set to nil. When referring to Instances, nil refers to an object that does not exist.
Accessing Variables[]
Now, we need to know how to use the variables. If you want to do something with a variable, just substitute the value with the variable name. What I mean is that both of these scripts yield the same results.
--Script 1
game.Workspace.Car.CanCollide = true

--Script 2
local Car = game.Workspace.Car
Car.CanCollide = true
You can see that variables are direct substitutions. Note that if you are accessing or updating a variable, do not use local. Only use local the first time the variable is mentioned.
However, this lengthens the script, and makes it more complicated. In this case, the first script would be more convenient than the second. However, variables are mostly used when a value is mentioned more than once.
But what's the difference between these two lines?
print(VariableName)
print("VariableName")
When you put data in strings, you need to place them in quotation marks. So, in the second line, you are telling the script to print the string, so you would see "VariableName" in the output window. In the first line, you are telling the script to print the variable, so it would print the value. However, make sure the variable name is spelled correctly with the right capitals, otherwise you'll get an error.
Now what is wrong with this script?
Car.Transparency = 1
local Car = game.Workspace.Car
Remember, Roblox Lua uses the same writing system as English; it is read left to right, top to bottom. Therefore, the script won't know what "car" is until it reaches line 2. Line 1 will not work.
The .new() Constructor[]
Earlier, I left you hanging on how to set color values.
BrickColor allows you to use a color from a preset list of colors that can be found here.
script.Parent.BrickColor = BrickColor.new("Really red")
The above script changes the BrickColor to "Really red," one of the colors in the list.
We call this a .new constructor. Basically, for certain data types, including BrickColor, we need to use a .new constructor to create a value for the data. Generally, it would work like this:
DataType.new(value here)
Color, however, is done differently, as it uses Color3. This is a data type that uses numbers, not names. There are 3 constructors for this data type, and see this tutorial if you wish to see an explanation for this constructor.
script.Parent.Color = Color3.new(0,1,0)
script.Parent.Color = Color3.fromRGB(230,230,230)
script.Parent.Color = Color3.fromHSV(0,1,0)
Vector3[]
There's another exception to setting properties. You will notice that the Roblox place is three-dimensional. It has three values: X, Y, and Z, each for one of the dimensions. Position and Size both use three values: X, Y, and Z. To set these, we use Vector3.
script.Parent.Position = Vector3.new(1,2,3)
Here, I am setting the X coordinate to 1, the Y coordinate to 2, and the Z coordinate to 3. Again, we use the .new constructor.
To learn to set Orientation, read here.
Comments[]
Now, what if we don't want to forget what each line does? It'd be such a hassle to have to read each line over and over again. So, placing 2 dashes, followed by the text, will make the script ignore the text.
script.Parent.Transparency = 1 --Makes brick invisible.
In this case, the script will perform the code, before ignoring the text you wrote after.
To make a multi-line comment. We will place 2 dashes followed by two square brackets, it should look like this.
--[[This is a
multi-line comment
]]
Functions[]
Which brings us to the final topic of the beginner tutorial: functions! A function, like a variable, is another way to simplify code. Think of it like leaving your wallet in your pocket instead of your bag to make it easier to get. A function is a piece of code that can be used over and over again. Like variables, we declare them. We do it like this:
local function Name()
    --Code
end
A few notes here:
- Local function creates the function.
- The blue text is the name of the function.
- The ( ) is reserved for parameters, which I will explain in the intermediate tutorial. However, regardless, all functions must be followed by ( ).
- It is conventional that the code inside the function is indented. This should be placed in your script automatically. However, if for some reason it doesn't, go to the top of the screen > Format Document.
- A function also has to be closed with the word end. Again, this is placed automatically.
That is a lot of points, but it will become second nature when you practice using them more often.
To make it actually work, though, we call the function. We do it just like this:
Name()
And that's all you need to know for now! Go over to the intermediate tutorial to continue. Good day.